Settings UI
This section will review the Settings Page contents and what items are available for each type of account, each section is available for both types of accounts unless highlighted.
In the Context Menu in the upper right corner, choose the Settings option to access the Account Settings for the active Account Context.
When viewing the Account Settings, the left area has your username, name, email address, and account number readily displayed in the first box. The second box indicates your current subscription plan, and the number of days remaining in your monthly usage period.
Profile
This feature is only available for individual "User Accounts".
The Profile tab allows you to change your username, name, company, and password. You cannot change your email address. The username is what gets displayed to other users as the owner of an engine, if you claim an engine.
Members
This feature is only available for "Team Accounts".
The Members tab allows Team Owners and Team Admins to manage the members of the team. When the Team Account is created, the only member is the User Account who created the team. The User who created the team has the role of Team Owner by default.
Click the “+” plus sign icon to add User Accounts to the Team Account. When inviting a user, you must specify both a name and email address. Adding a User Account will send an invitation to that User Account to join the Team Account.
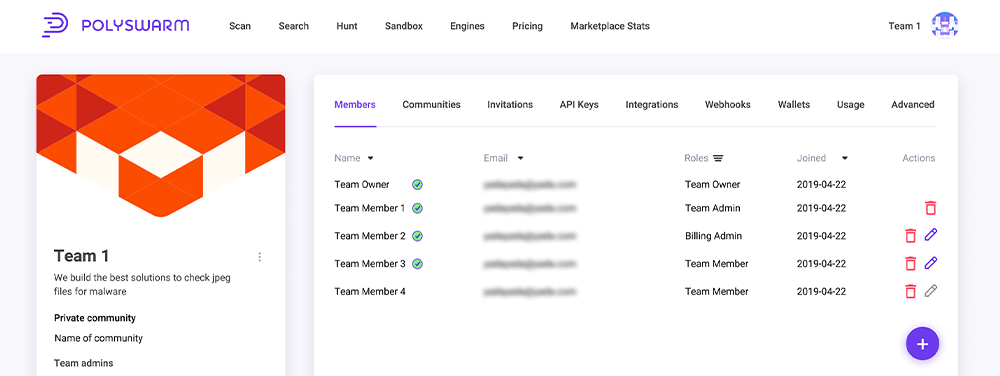
Click the Edit icon (Pencil) to edit a User, including modifying their Team Roles.
Members can be removed from the team, but there must always be at least one Team Owner.
Members - Roles
Role-based access control defines a User's permissions to view or edit various tabs and content. This includes the Team Account Settings tabs and content as well as other content outside of the settings. The below highlights what access each kind of Role has access too and the functionality available.
Advanced Tab
| Team Member |
Billing Admin |
Community Admin |
Microengine Admin |
Wallet Admin |
Team Admin |
Team Owner |
|
|---|---|---|---|---|---|---|---|
| View | - | - | - | - | - | X | X |
API Keys Tab
| Team Member |
Billing Admin |
Community Admin |
Microengine Admin |
Wallet Admin |
Team Admin |
Team Owner |
|
|---|---|---|---|---|---|---|---|
| View | X | X | X | X | X | X | X |
| Add | X | X | X | X | X | X | X |
| Delete | - | - | - | - | - | X | X |
Integrations Tab
| Team Member |
Billing Admin |
Community Admin |
Microengine Admin |
Wallet Admin |
Team Admin |
Team Owner |
|
|---|---|---|---|---|---|---|---|
| View | - | - | - | - | - | X | X |
| Add | - | - | - | - | - | X | X |
| Delete | - | - | - | - | - | X | X |
Invitations Tab
| Team Member |
Billing Admin |
Community Admin |
Microengine Admin |
Wallet Admin |
Team Admin |
Team Owner |
|
|---|---|---|---|---|---|---|---|
| View | - | - | - | - | - | X | X |
| Add | - | - | - | - | - | X | X |
| Delete | - | - | - | - | - | X | X |
| Resend | - | - | - | - | - | X | X |
Members Tab
| Team Member |
Billing Admin |
Community Admin |
Microengine Admin |
Wallet Admin |
Team Admin |
Team Owner |
|
|---|---|---|---|---|---|---|---|
| View | X | X | X | X | X | X | X |
| Add | - | - | - | - | - | X | X |
| Edit | - | - | - | - | - | X | X |
| Delete | X | X | X | X | X | X | X |
Usage Tab
| Team Member |
Billing Admin |
Community Admin |
Microengine Admin |
Wallet Admin |
Team Admin |
Team Owner |
|
|---|---|---|---|---|---|---|---|
| View | X | X | X | X | X | X | X |
| Edit | - | X | - | - | - | X | X |
Wallets Tab
| Team Member |
Billing Admin |
Community Admin |
Microengine Admin |
Wallet Admin |
Team Admin |
Team Owner |
|
|---|---|---|---|---|---|---|---|
| View | - | - | - | - | X | X | X |
| Edit | - | - | - | - | X | X | X |
Webhooks Tab
| Team Member |
Billing Admin |
Community Admin |
Microengine Admin |
Wallet Admin |
Team Admin |
Team Owner |
|
|---|---|---|---|---|---|---|---|
| View | - | - | - | X | - | X | X |
| Add | - | - | - | X | - | X | X |
| Delete | - | - | - | X | - | X | X |
Invitations
This feature is only available for "Team Accounts".
The Invitations tab allows Team Owners and Team Admins to manage Team member invitations. It will list all currently active team invitations and will allow the Team Owners and Team Admins to delete or resend invitations. All invited Team Members are set with the Team Member role by default. Adding additional Team Roles is done via the Members tab after they have accepted the Team Invitation.
API Keys
The API Keys tab allows User/Team Account members to manage their own API Keys.
API Keys allow PolySwarm to authenticate and associate your usage activity with the related account. All API Keys in a Team account share the Subscription Plan for that Team account.
The "Personal Account" section has your API Keys for your User Account. The "Team Account" section has your API keys for all Team Accounts where your User Account is a member. In a Team account, each Team Member has their own separate API Keys and each Team Member can view/delete their own API Keys. If you are a member of one or more Team Accounts, you will see API Keys listed for each Team Account. All of these API Keys are unique to you. They are not visible or shared with other Users.
You must have at least one API Key in each account at all times, so we automatically create the first API Key in each account. You can create more API Keys, and you can delete any API Key, but we do not permit deletion of the API Key if it is the only one for that account.
When you create an API key, you can give it a Name and Expiration Date. A Name is now required and the Expiration Date defaults to never expires. When an API Key expires, it is not deleted, but it will no longer be accepted as valid. You will get an email notification when one of your API keys is expiring.
Integrations
This feature is only available for "Team Accounts".
The Integrations tab allows Team Owners and Team Admins to manage their Integration API Keys. These are special API keys that are shared by ALL Team Members with the Team Owner or Team Admin role. When creating an Integration, you can specify a Name and Expiration Date.
Just like regular API Keys, by default, the Name is blank, and Expiration Date is never expires. And when the key does expire, you will be notified by email and the key will no longer be valid to use.
Webhooks
The Webhooks tab in the User Account or Team Account Settings of a PolySwarm UI Account allows you to manage webhooks used by your Account. In a Team Account, a User must have the Team Admin or Microengine Admin role to view and use the Webhooks tab.
To create your first webhook, click the “Create webhook” button to open the webhook creation window. If you have one or more existing webhooks, you can click the “+” button to create another one.
In the Create Webhook window, enter the Webhook URL and its Rate Limit. Then click Save.
Once the Webhook has been created you can access a number of features listed below.
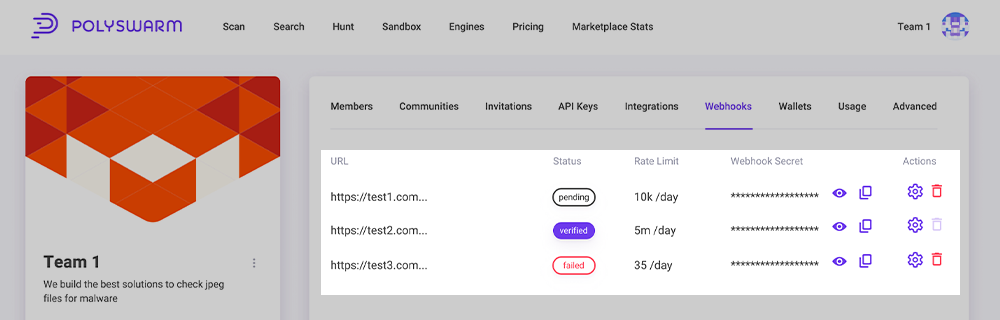
- URL: The Webhook URL must be the full URI that your web server is listening on to receive a webhook. It must use HTTPS. Often it will be something like: “https://example.com:1234/my/api/”
-
Status: A Webhook’s Status will be in one of the following states:
Pending- The Webhook has been created, but has not been tested.Verified- The Webhook has been tested and the remote service responded correctly.Failed- The Webhook was Verified, but the remote service is no longer responding. If a Webhook is in the Failed state, it needs to be Tested again to become Verified.
- Rate Limit: The rate limit is the number of webhook messages your Webhook URL can process in one day (24hr period). This is the mechanism that you can use to control how many bounties your Engine receives in a day.
- WebHook HMAC Secret: The Webhook’s HMAC Secret is used to allow the remote web service to verify that the webhook call was made by the PolySwarm Marketplace. All Webhook calls are signed using the HMAC Secret, and can thus be verified by the recipient. In the Webhooks tab, the HMAC Secret is hidden by default. You can click the “Eye” icon to view it or click the “Copy” icon to copy it to your clipboard.
- Testing: In the Actions column, you can click on the “Gear” icon to open the Webhook Test window. Click the “Test” button to send a “Ping” action to the remote webhook server. Give it about one minute to send the webhook. If the webhook server responds to the Ping action, the Status will update to be “verified”.
- Deleting: To delete a webhook, click the “Trash” icon in the Actions column. A webhook cannot be deleted if it is associated with an Engine. You need to remove the Webhook association from the Engine, and then you can delete the webhook.
Rewards
The Rewards tab allows you to manage your participation in the NectarNet Rewards program. This program allows users to share information automatically through browsing the internet and get paid in NCT coin. You can view your rewards summary, and you can Redeem your Rewards.
Wallet
The Wallets tab allows team members with the Team Admin or Wallet Admin roles to manage your Wallets, you can also manage individual wallets if logged in as a "User".
In a Team Account, a User must have the Team Admin or Wallet Admin role to view and use the Wallets tab. All Users must enable 2-factor authentication (2FA) on their User Account before they can view the Wallets tab content.
Rewards Wallets
The section named "Rewards Wallets" is the Wallets used by PolySwarm Rewards programs. Once a User has opted into a Rewards program, there will be one row in this table for their Rewards wallet.
- Wallet - The name of the Rewards program
- Balance (NCT) - The current NCT balance of the Wallet
- Deposit Address - Rewards wallets do not currently support deposits.
- Withdrawal Address - An external ETH/NCT address where NCT tokens are sent when withdrawn from this Wallet (Redeemed).
- Withdrawal Limit - Max amount of NCT that can be withdrawn per day from this Wallet.
In the Actions menu, there will be one or more options depending on the status of your wallet.
- Configure Withdrawals - This is where you define your
Withdrawal Addressand yourWithdrawal Limit. This is the first step you must do. - Withdrawals - Once you have defined a
Withdrawal Addressthis option will be active. Use this to withdraw NCT from your Rewards wallet and transfer the NCT to your personal ETH/NCT wallet. Withdrawals from a Rewards wallet can be initiated using the Action menu, or by clicking the Redeem button on the Rewards tab.
Below the name of the wallet is a Transactions table. Click the down arrow to view the set of Deposit and Withdrawal transactions for your Rewards wallet. NOTE: The Rewards payouts are not included in this table.
Engine Wallets
The section named "Engine Wallets" are the Wallets used by Engines (Microengines and Arbiters). There is a separate row in the table for each Engine owned by an Account.
- Wallet - The name of the Engine
- Balance (NCT) - The current NCT balance of the Engine's Wallet
- Deposit Address - The Address where you can deposit NCT to add to your Engine's Wallet. If your Engine has not been Verified before, this will say "Pending Engine Verification".
In the near future, we will be adding functionality to support making withdrawals from an Engine Wallet.
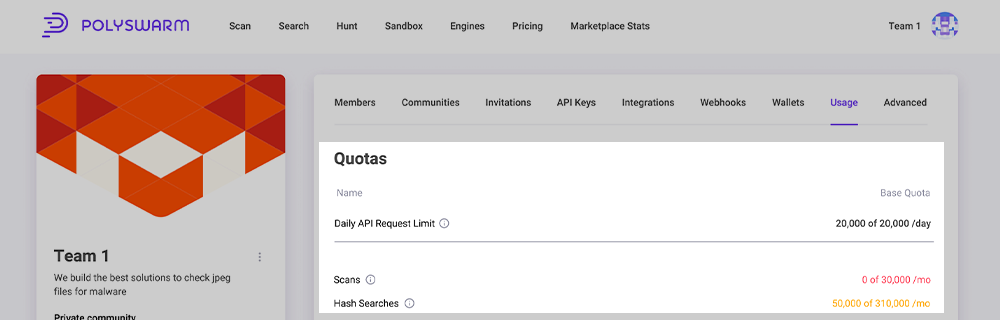
Usage
The Usage tab displays the list of features available in the current Subscription Plan.
The Daily API Request Limit is the maximum number of every total feature usage allowed per 24hrs.
Next to each feature is the remaining number of times out of the total number of times that feature can be used, per quota reset period.
Example: Hash Searches 6,692,085 of 7,000,000 /mo, means you have 6,692,085 times left to use Hash Searches in that Month and the feature has been used 307,915 times.
Activity
The Activity tab provides access to functionality to report on events from members of your team.
Note: Team Admin and Team Owner accounts will be able to view events from all team members, non team admin accounts can only see events from their own account.
This page will display the following items in the table:
| Item | Functionality |
|---|---|
| Timestamp | A time stamp showing when the event took place. |
| Event Type | Currently able to view Events for Sandbox Submissions (sandbox_submit, sandbox_create) and Scan Submissions (scan_submit, scan_create). |
| User | The Name and Email for the account that triggered the Event. |
| Metadata | Accompanying Metadata to the Event Type. This will vary for each Event Type but can contain information like the filename, full user name and instance ids. Clicking on the metadata will provide a popup with the full content. |
The Activity Page can be filtered based on the below items.
- Event Type - Filter on Event Type i.e. Scan Create
- User - Filter on User Events
- Timestamp - Period to Filter on Events
- Metadata - Various Metadata to filter on, for example Filename, Hash, Instance ID
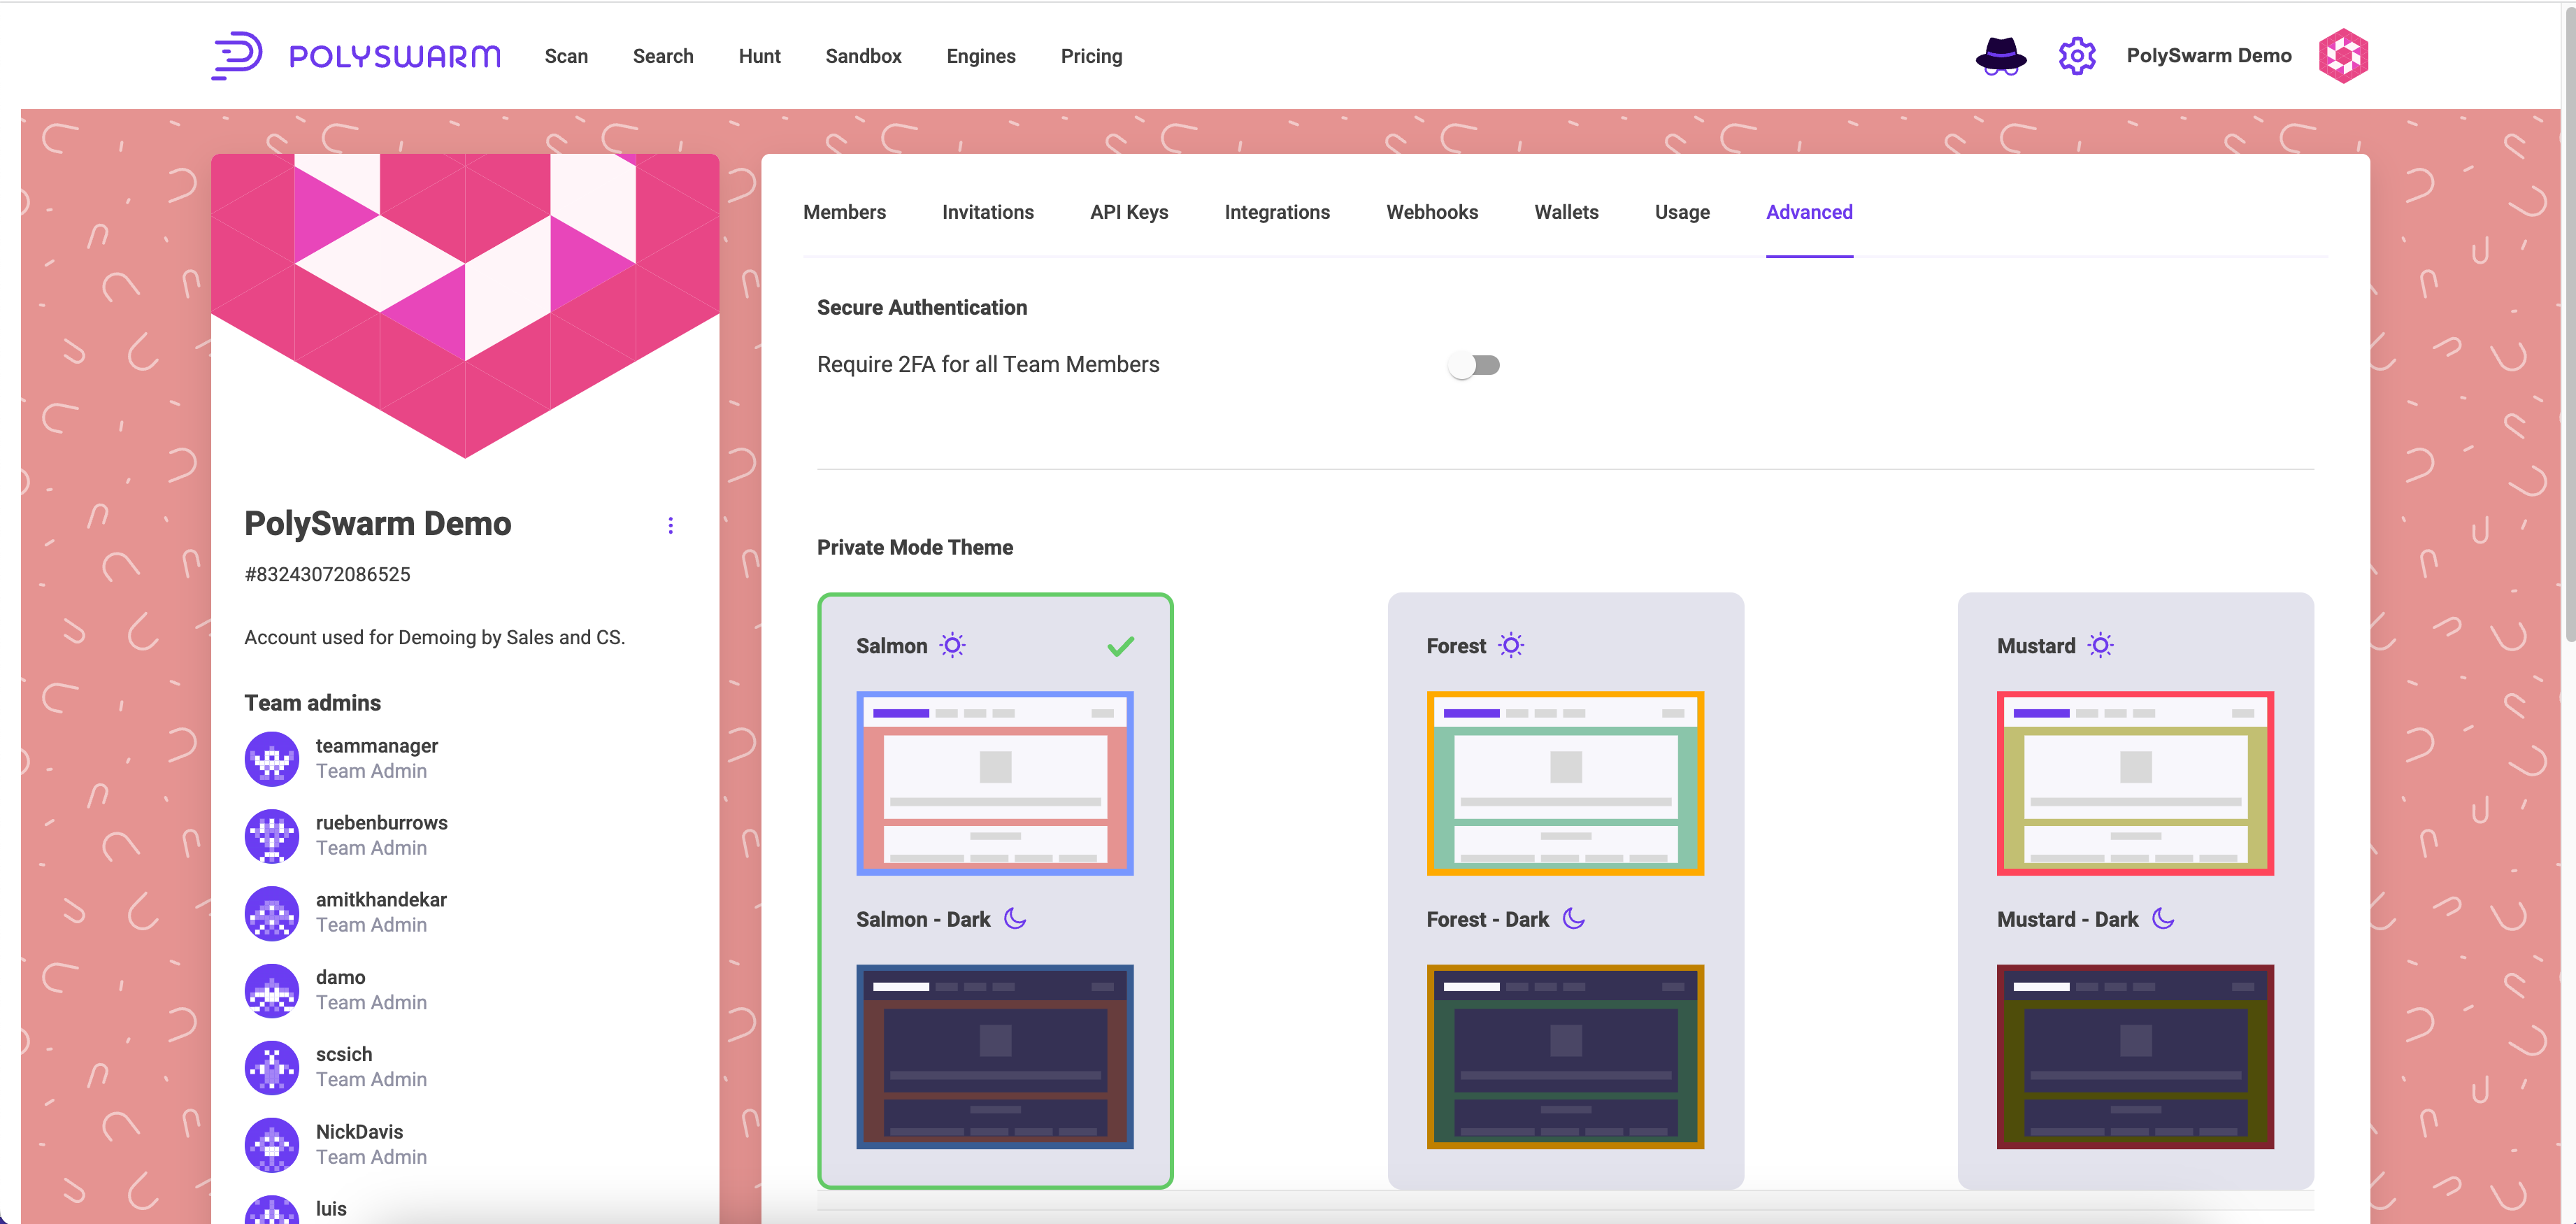
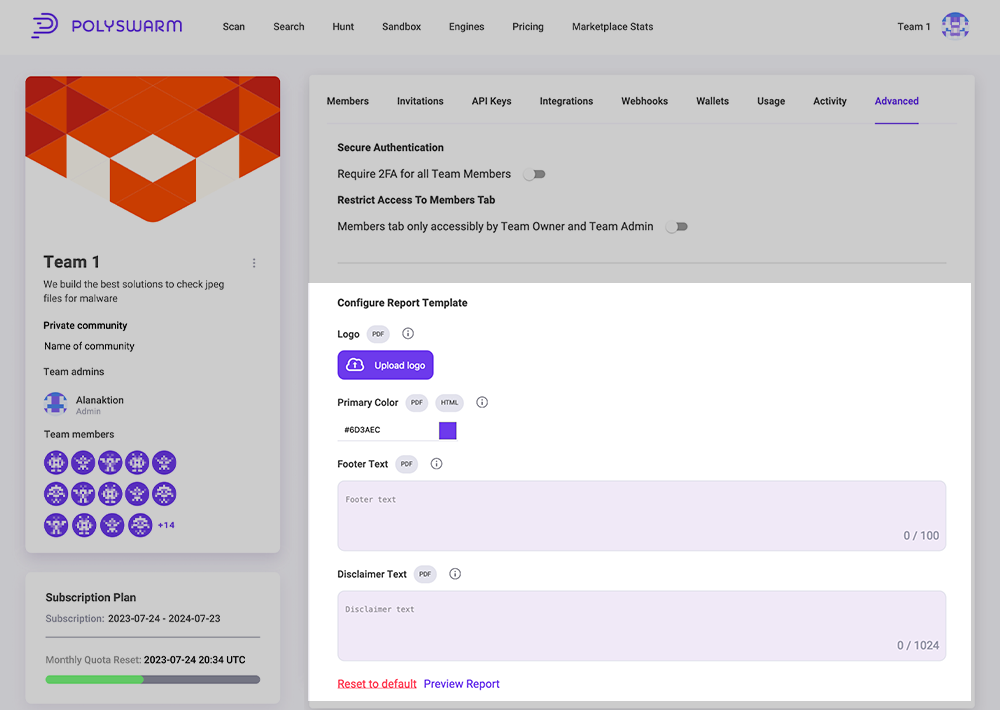
Advanced
The Advanced tab provides access to functionality that is less often accessed.
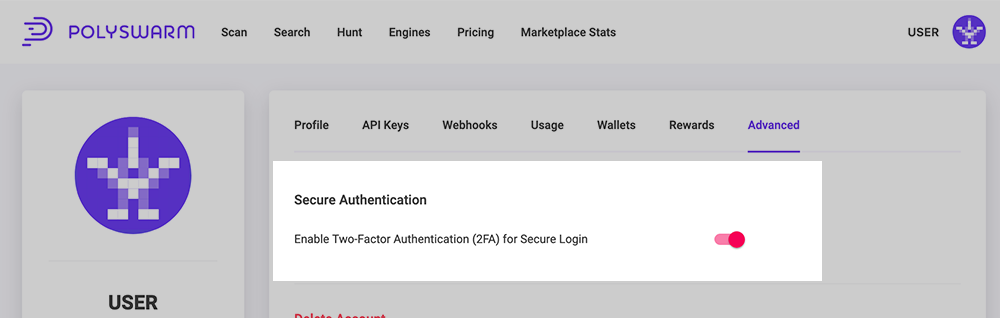
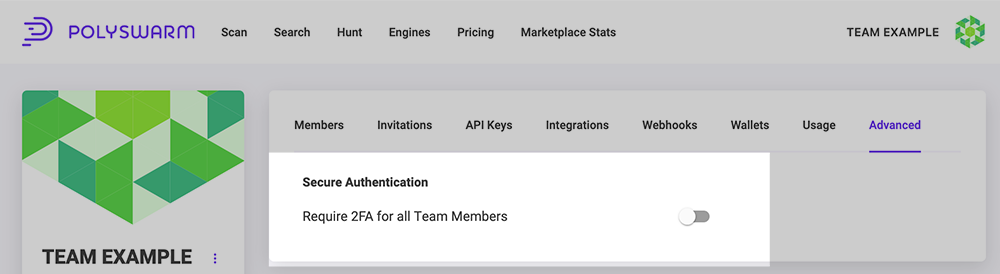
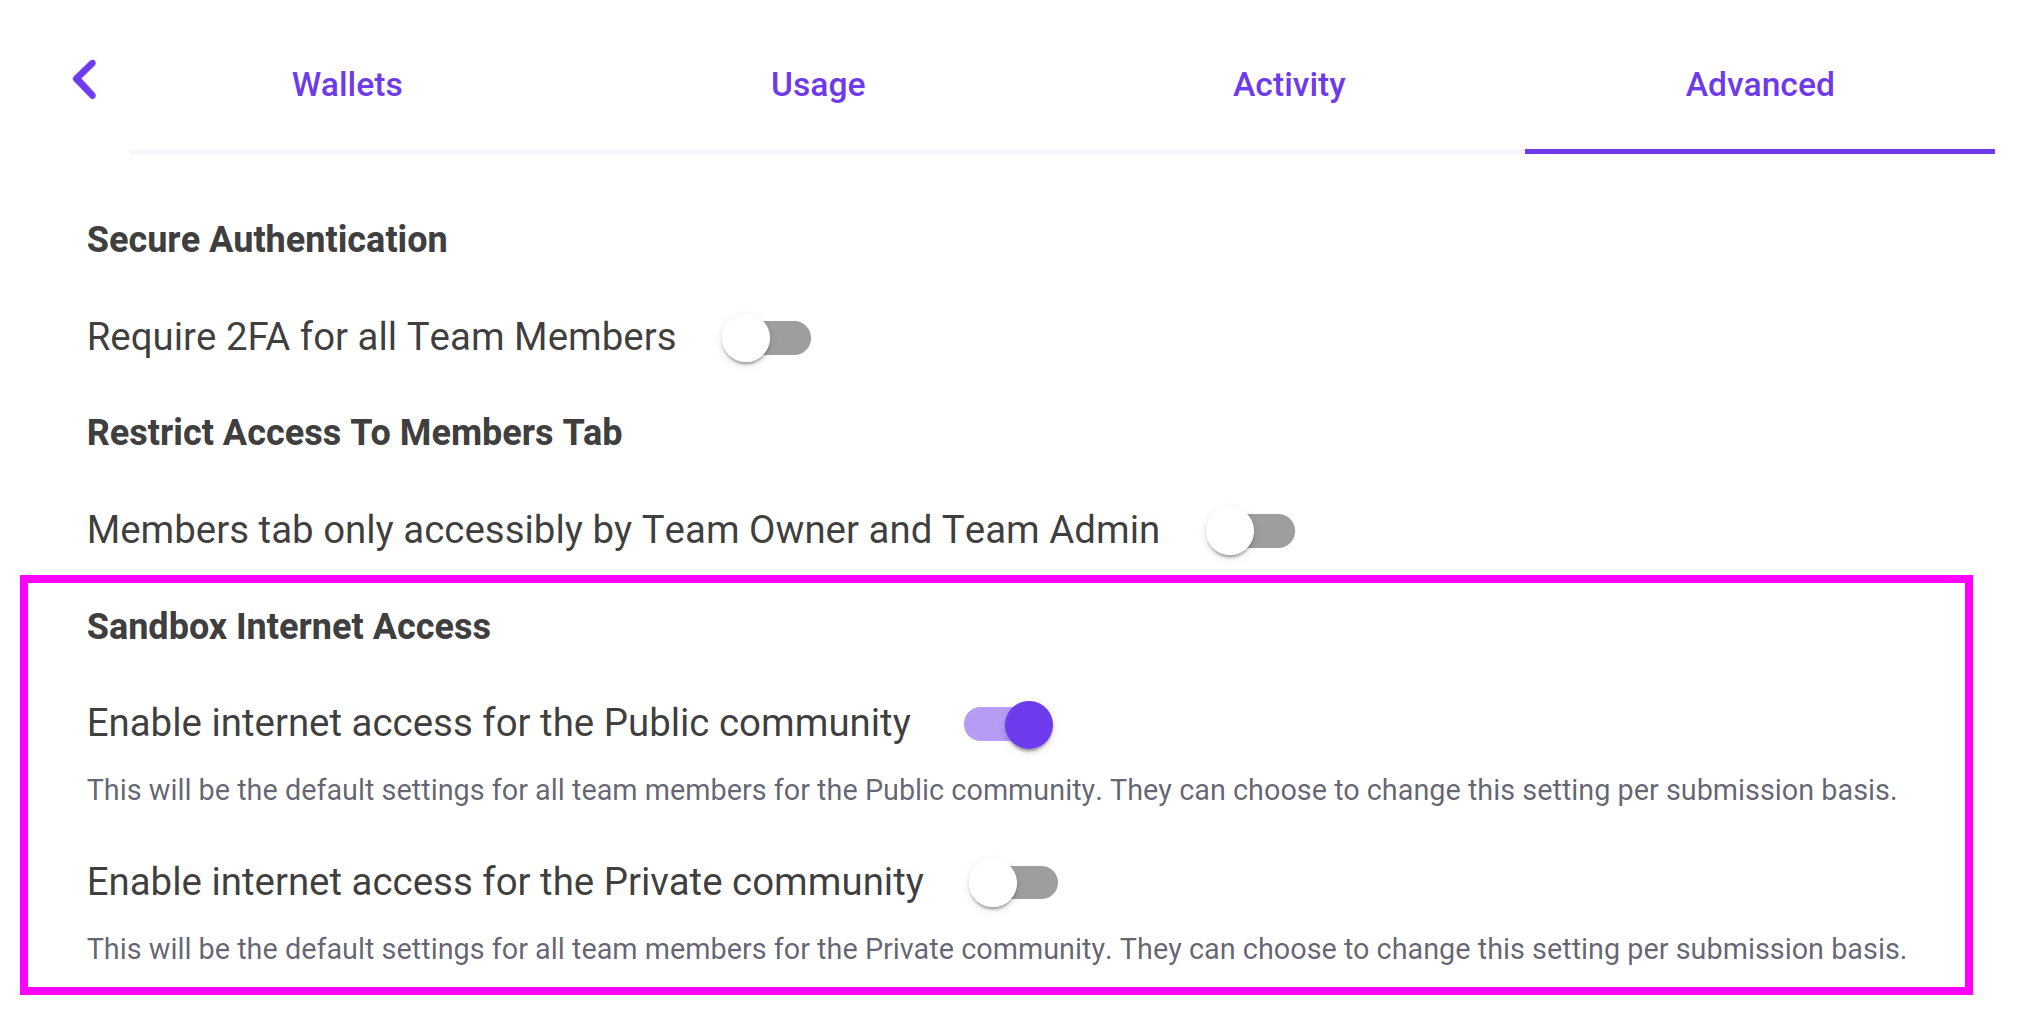
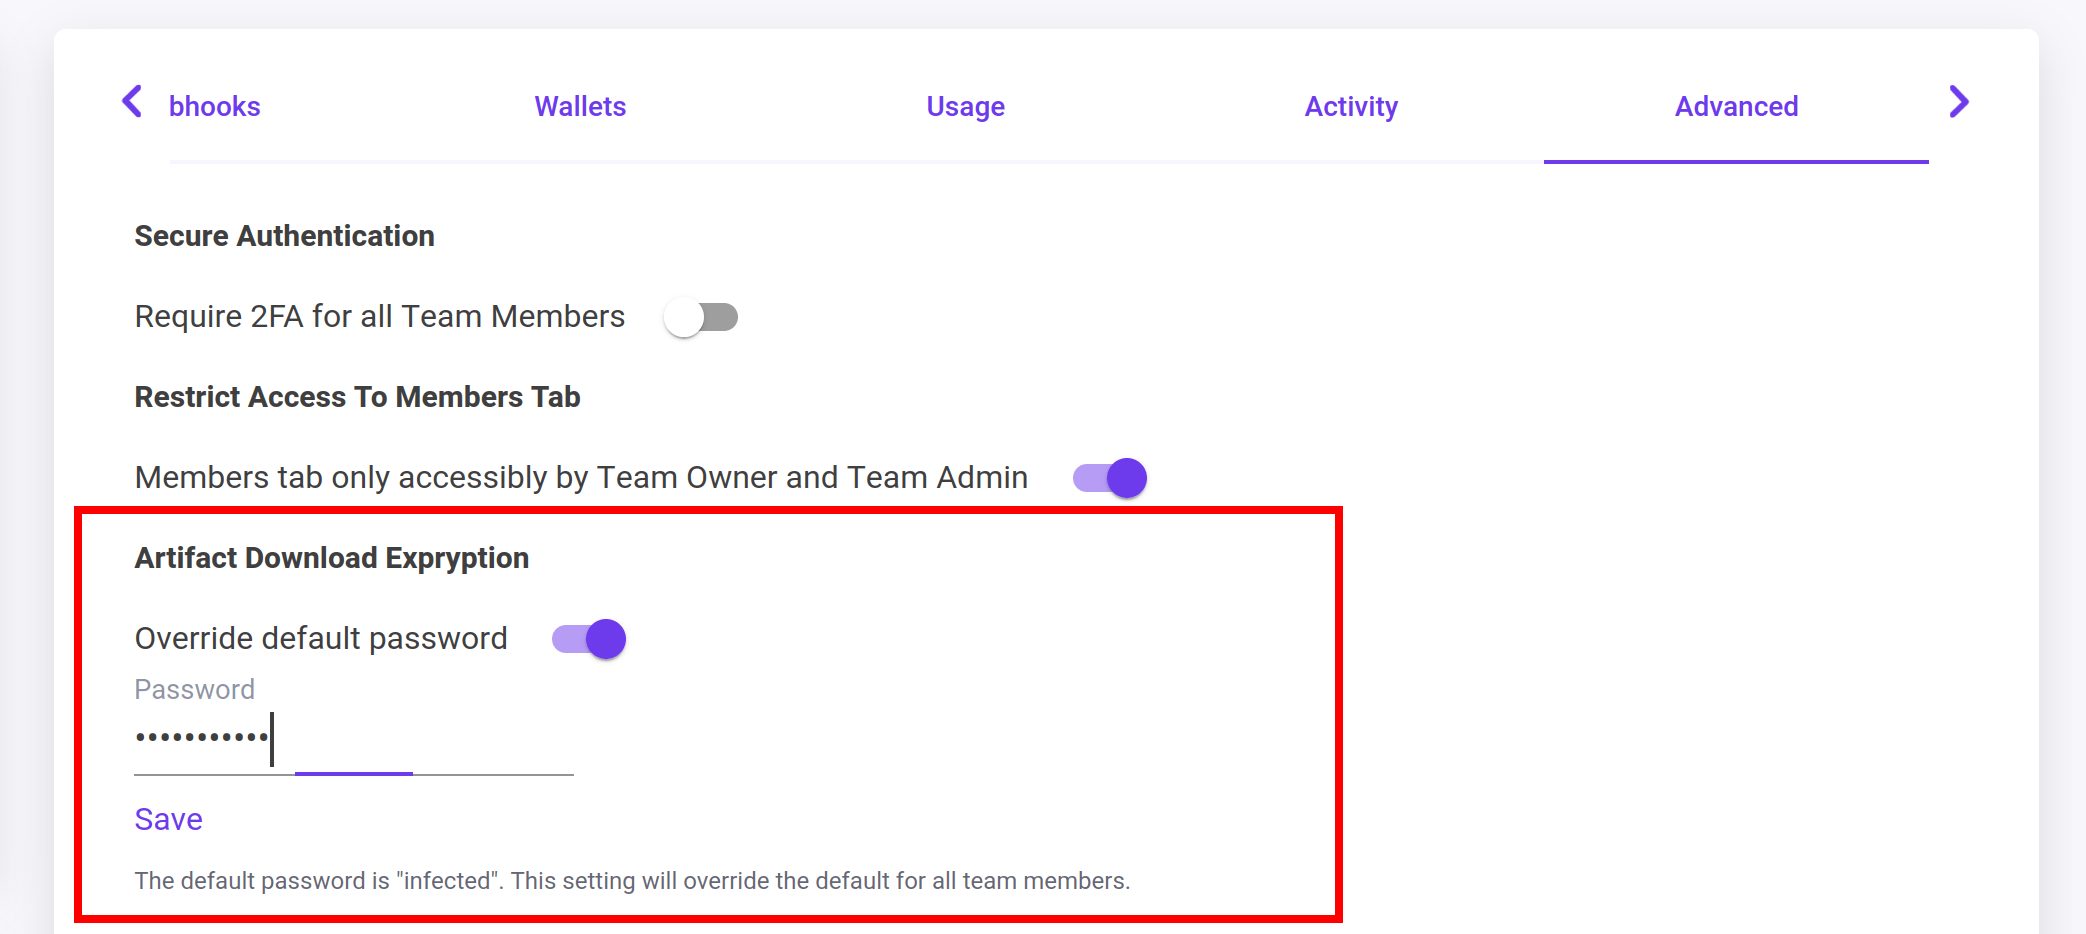
Secure Authentication
Enabling Secure Authentication is highly recommended, especially when an email address and password are used to log in.
This section will change depending on if the access is a User Account or a Team Account.
In a user context: The button will say "Enable Two-Factor Authentication (2FA) for Secure Login." This encourages individual users to activate 2FA to enhance the security of their login process.
In a team context: The button will say "Require 2FA for all Team Members." This emphasizes the importance of implementing 2FA for every member of the team, making it mandatory for enhanced security across the entire team.
For Users who have Engines or Wallets associated with their User Account, Enabled Secure Authentication is required.
Restrict Access To Members Tab
If turned on, only Team Admins or Team Owners can see the Members tab.
Sandbox Internet Access
This section allows users the ability to define if the 'internet' is turned on or off by default when sandboxing in the specific communities.
Artifact Download Encryption
The default password when downloading files via the UI is infected, this section allows this to be override with a password of you choice. This change will affect all downloads for all team members.
Notifications
Enabling Notifications will provide email alerts for the individual user when a Sandbox Task has ended. Enabling or disabling this will effect the single user profile only, not the whole team.
Further to this, Email Notifications will be sent out when each feature in your plan gets to 90% used in your quota window. The User must have the Team Owner or Billing Admin role assigned to them to receive these.

Delete Account
This feature is only available for individual "User Accounts".
This feature will will permanently delete the user account. There are some things to be aware of when deleting an account.
- If the user is the only Team Admin on a team, they cannot delete their account. The team has to first assign another user as a Team Admin.
- If the user has a claimed engine, they cannot delete their account. The user has to first delete their engine claim.
- If the user has an active Live Hunt, it will be automatically stopped and deleted.
- All Live and Historical Hunting instances, results, and rules will be deleted.
- All user account information will be deleted.
Warning: There is no way to undo an account deletion once deleted!
Configure Report Template
Provides the ability to change the template used for html and pdf reports. Accounts with the Team Owner or Team Admin role can change the template. The template they set will apply to the generation of all reports from all members of the team.
| Item | Functionality |
|---|---|
| Logo | Upload a png or jpeg for the logo, the max file size is 40KB and dimensions are 960x960. |
| Primary Color | Select the primary color from the color picker, or use the hex code. applies to thehtml and pdf report. |
| Footer Text | Text displayed at the bottom of each page. |
| Disclaimer Text | Text displayed on the last page. |
Private Mode Theme
If you have a Private Community, only Accounts with the Team Owner or Team Admin role can change the Theme. The Theme they set will apply to all members of the team.